# Webpack 打包流程分析
# Compiler 和 Compilation
# Compiler
Compiler 继承自 Tapable,是 Webpack 的整个生命周期管理,代表了完整的 Webpack 环境配置。
每个Webpack 的配置,对应一个 Compiler 对象,记录了 Webpack 的 options 、loader 和 plugin 等信息,并且通过的 Hook 机制管理整个打包流程的生命周期。
# 钩子
我们在代码中新建 compilerHooks.js,来看看我们执行 webpack 过程中运行了哪一些钩子:
const webpack = require('webpack');
// 我们这里的配置文件是一个函数
const webpackConfig = require('./config/webpack.common.js');

const compiler = webpack(webpackConfig());

// 遍历hooks,添加回调,输出`hookName`
Object.keys(compiler.hooks).forEach(hookName => {
  if (compiler.hooks[hookName].tap) {
    compiler.hooks[hookName].tap('anyString', () => {
      console.log(`run -> ${hookName}`);
    });
  }
});

// 触发webpack的编译流程
compiler.run();
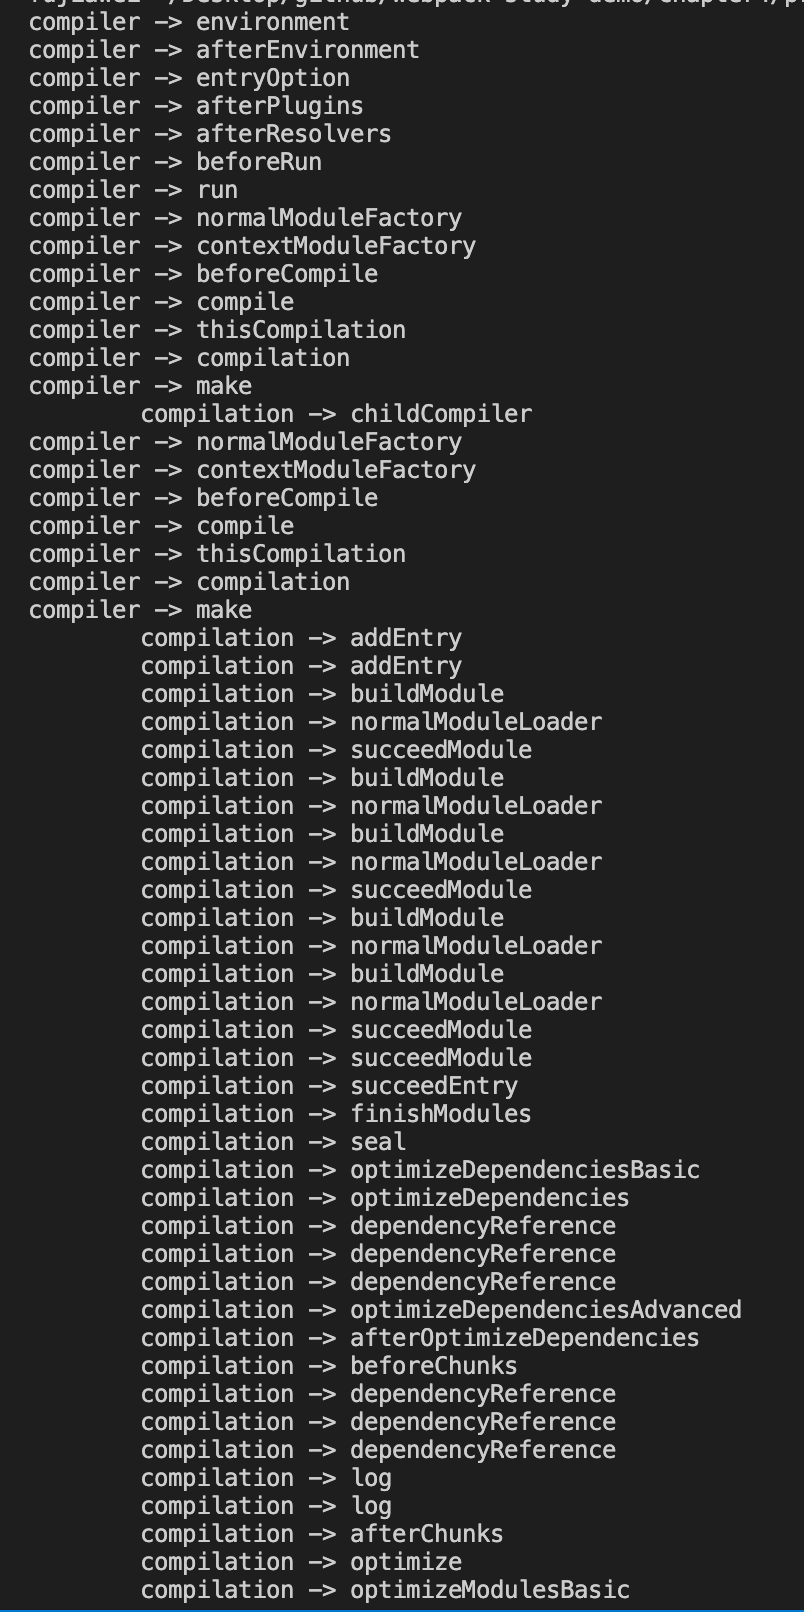
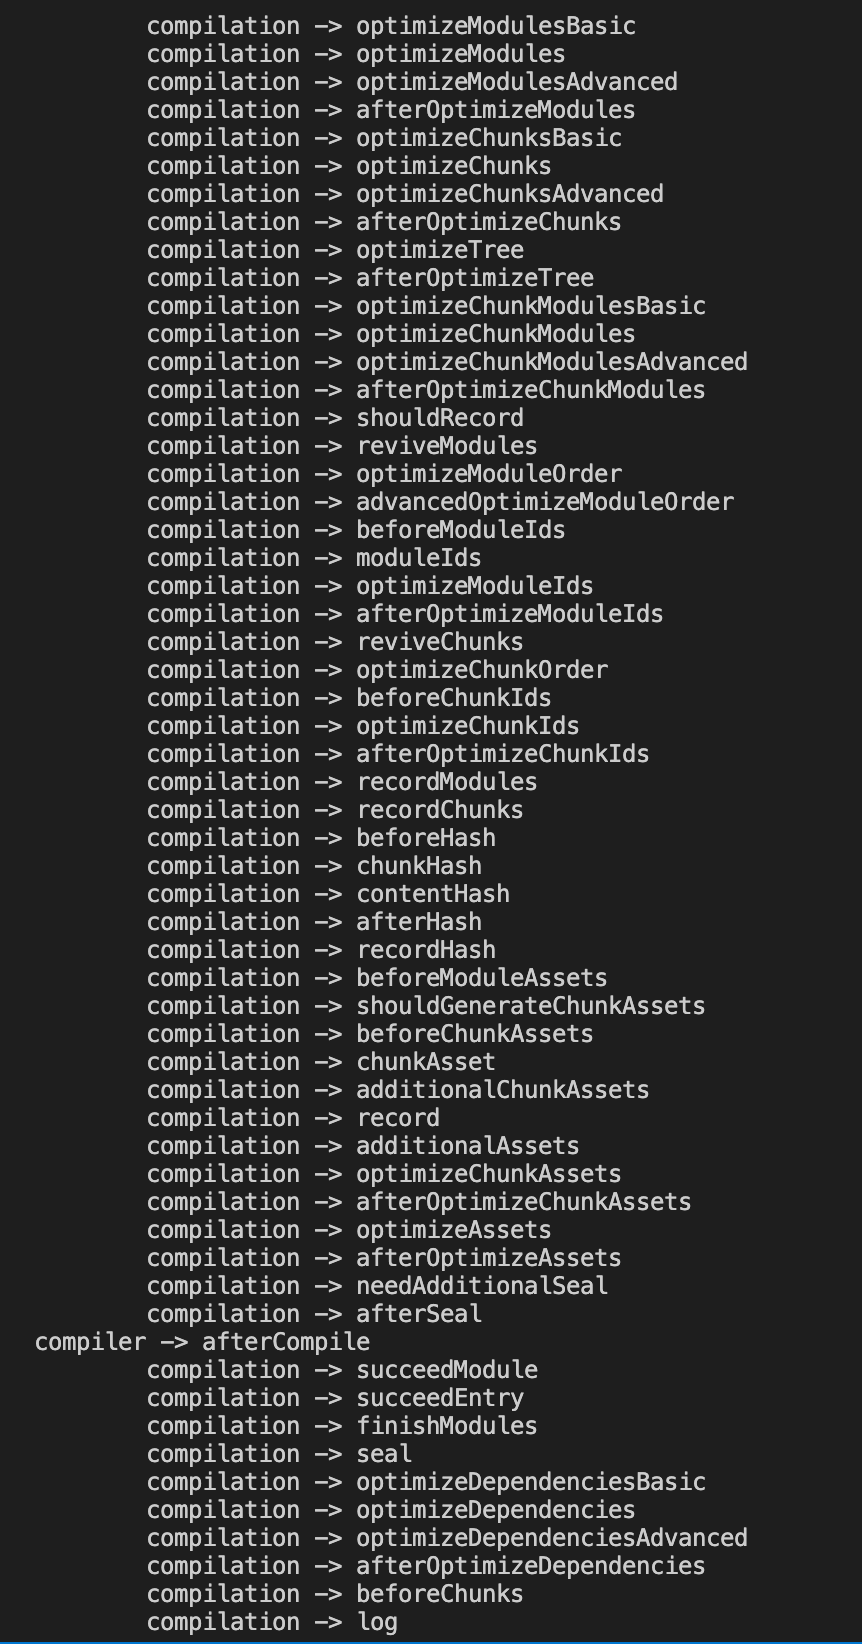
接着在命令行中运行:node compilerHooks.js,可以看到如下输出:
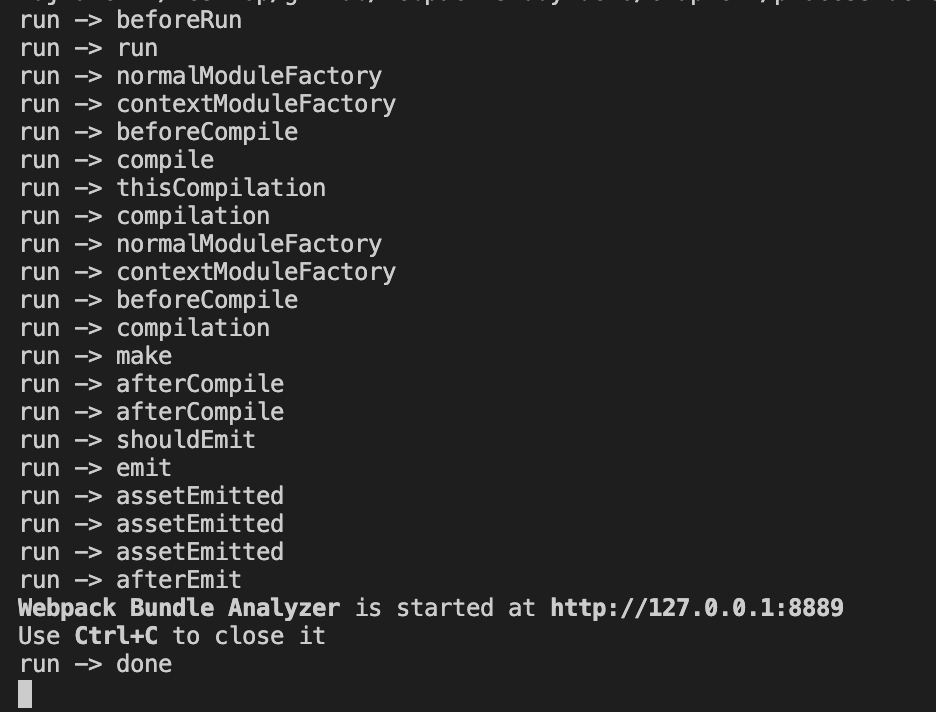
这里面还只是 webpack 的 compiler 上面的部分钩子,还有很多钩子没有被打印,比如处理 入口文件 entryOption,准备编译环境 environment,打包失败 failed 等等,更多的大家可以参考 compiler 官方 hooks 文档。
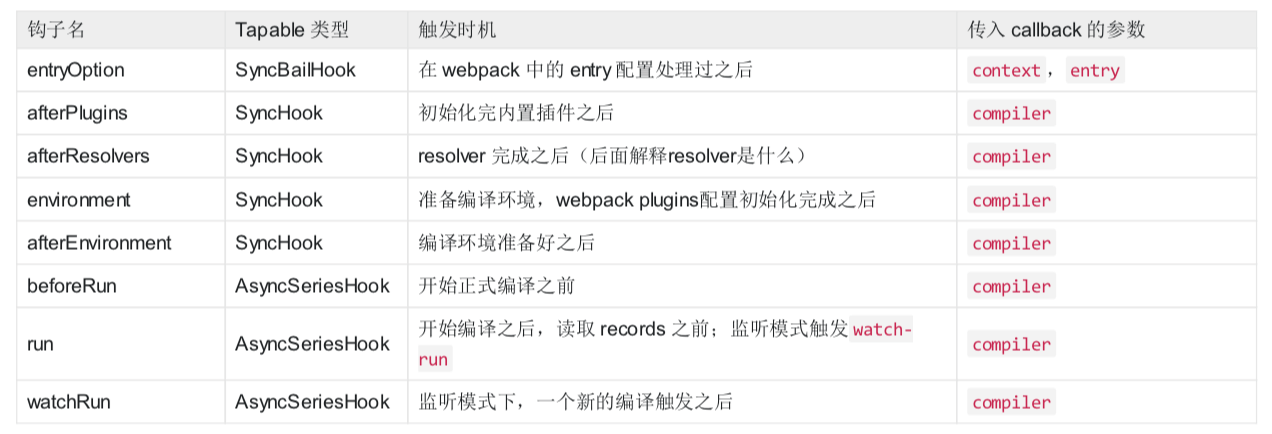
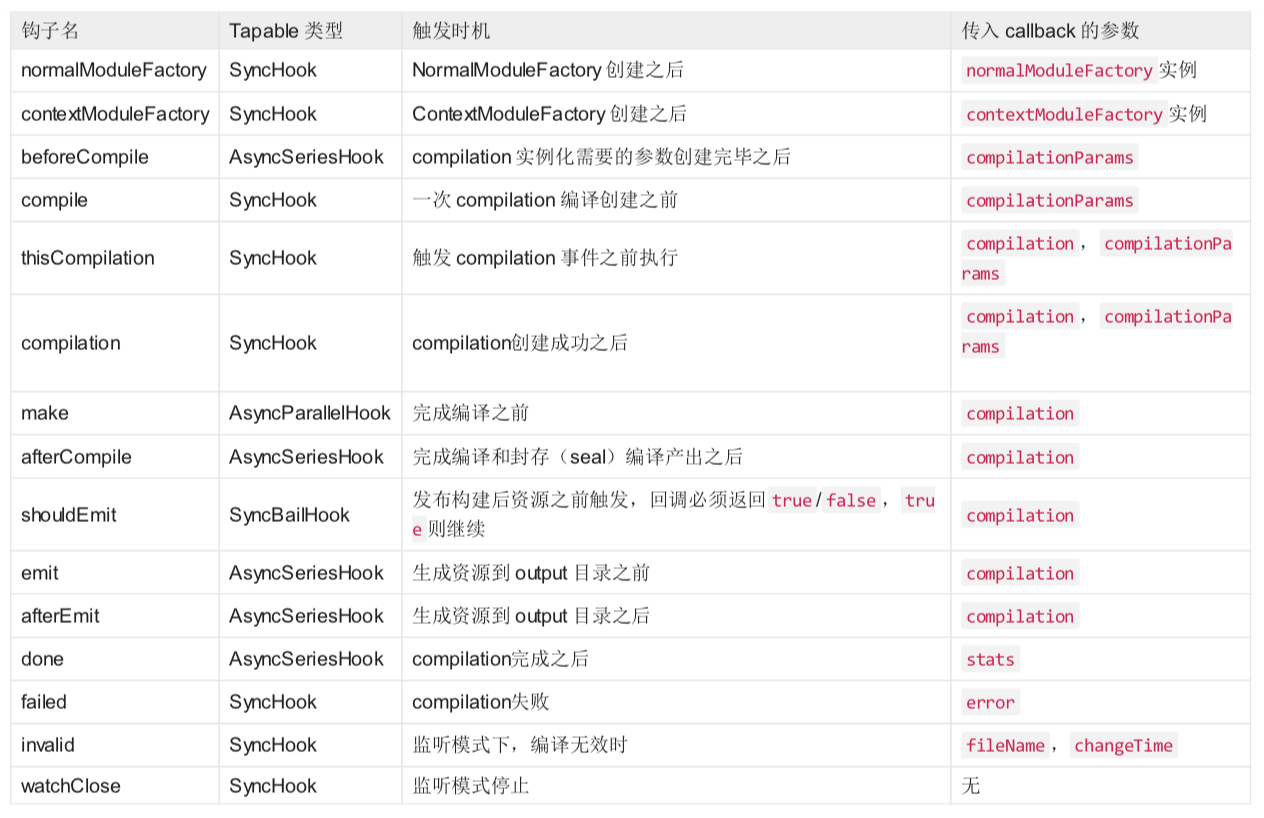
一些参考如下图所示:
注意点:
这里有
thisCompilation和compilation两个钩子,是跟子编译(
child compiler)有关,Compiler实例通过createChildCompiler方法可以创建子编译实例childCompiler。创建childCompiler时,会复制compiler实例的任务点监听器。compilation的钩子会被复制,而thisCompilation钩子则不会被复制。
# Compilation
Compilation 也继承自 Tapable,代表了一次资源版本构建,包含了当前的模块资源、编译生成资源、变化的文 件、以及被跟踪依赖的状态信息。
每次构建过程都会产生一次 Compilation,比如我们启动 watch 功能的时候,每当检测到一个文件变化,就会重新创建一个新的 Compilation,从而生成一组新的编译资源。
Webpack的插件是在apply方法接收Compiler对象来给某个流程添加钩子回调,钩子回调函数接收的是记录当前状态的Compilation对象。之后会在plugin小结讲到。
# 钩子
在 Compilation 中处理的对象分别是 module、chunk、asset,由 modules 组成 chunks,由 chunks 生成 assets,处理顺序是 module → modules → chunks → assets,先从单个 module 开始处理,查找依赖关系, 最后完成单个 module 处理,拼装好 modules 之后,开始 chunks 阶段处理,最后在根据优化配置,按需生成assets。
Compilation 的钩子很多,就讲几个重要的钩子:
- seal:SyncHook
编译(compilation)停止接收新模块时触发
- optimize:SyncHook
优化阶段开始时触发
- optimizeModules:SyncBailHook
模块的优化
- optimizeChunks:SyncBailHook
优化 chunks
- additionalAssets:AsyncSeriesHook
为编译(compilation)创建附加资源(asset)
- optimizeChunkAssets:AsyncSeriesHook
优化所有 chunk 资源(asset)
- optimizeAssets:AsyncSeriesHook
优化存储在 compilation.assets 中的所有资源 (asset)
- normalModuleLoader:SyncHook
普通模块 loader,真正(一个接一个地)加载模块 图(graph)中所有模块的函数
更多的大家可以参考 Compilation 官方 hooks 文档。
Compilation有个很重要的对象是Stats对象,通过这个对象可以得到Webpack打包后的所有module、chunk和assets信息,通过分析Stats对象可以得到很多有用的信息,比如webpack-bundle-analyzer这类分析打包结果的插件都是通过分析Stats对象来得到分析报告的。具体代码可以参考:
lib/Stats.js
# Compiler 和 Compilation 关系
Compiler:代表的是不变的Webpack环境,是针对Webpack的。例如watch模式下,传入的Webpack配置是不变的,不管执行几次Compilation都不变;Compilation:针对的是随时可变的项目文件,只要文件有改动,Compilation就会被重新创建。
# 流程
Webpack 的基本流程可以分为三个阶段:
- 准备阶段:主要是创建
compiler和Compilation对象 - 编译阶段:这个阶段主要是完成
modules解析,并且生成相应的chunks - 产出阶段:这个阶段的主要任务是根据
chunks生成最终文件,主要有三个步骤:模板 Hash 更新,模板渲染 chunk,生成文件。
# 准备阶段
首先 webapck 会初始化参数,从配置文件和命令行中读取并合并参数,得到 webpack 最终的配置参数。(shell 中的参数的优先级高于配置文件)。
接着根据上面得到的配置参数,实例化一个 compiler 类,并且注册所有的插件,给对应的 webpack 构建生命周期绑上相应的 hook。
// webpack 4.41.5
// lib/webpack.js

options = new WebpackOptionsDefaulter().process(options);

compiler = new Compiler(options.context);
compiler.options = options;

// 绑定 NodeEnvironmentPlugin
new NodeEnvironmentPlugin({
  infrastructureLogging: options.infrastructureLogging
}).apply(compiler);

// 绑定配置文件中的 plugins
if (options.plugins && Array.isArray(options.plugins)) {
  for (const plugin of options.plugins) {
    if (typeof plugin === "function") {
      plugin.call(compiler, compiler);
    } else {
      plugin.apply(compiler);
    }
  }
}
// 触发 compiler 环境 的 hook
compiler.hooks.environment.call();
compiler.hooks.afterEnvironment.call();
// 注册 webpack 内置插件
compiler.options = new WebpackOptionsApply().process(options, compiler);
其中上面 WebpackOptionsApply 用于将所有的配置 options 参数转换成 webpack 内置插件:
比如:
- output.library:使用 LibraryTemplatePlugin
- externals:使用 ExternalsPlugin
- devtool:使用 EvalDevtoolModulePlugin,SourceMapDevToolPlugin
- Mode=prodution:使用 FlagIncludedChunksPlugin、TerserPlugin 等
在 WebpackOptionsApply 跟构建流程相关性比较大的是 EntryOptionPlugin:
// webpack 4.41.5
// lib/WebpackOptionsApply.js

const EntryOptionPlugin = require("./EntryOptionPlugin");

new EntryOptionPlugin().apply(compiler);
compiler.hooks.entryOption.call(options.context, options.entry);
它会解析传给 Webpack 的配置中的 entry。这里不同类型的 entry包括:SingleEntryPlugin、 MultiEntryPlugin、DynamicEntryPlugin 三类,分别对应着单文件入口、多文件入口和动态文件入口(函数):
// webpack 4.41.5
// lib/EntryOptionPlugin.js
const itemToPlugin = (context, item, name) => {
	if (Array.isArray(item)) {
		return new MultiEntryPlugin(context, item, name);
	}
	return new SingleEntryPlugin(context, item, name);
};

module.exports = class EntryOptionPlugin {
	/**
	 * @param {Compiler} compiler the compiler instance one is tapping into
	 * @returns {void}
	 */
	apply(compiler) {
		compiler.hooks.entryOption.tap("EntryOptionPlugin", (context, entry) => {
			if (typeof entry === "string" || Array.isArray(entry)) {
				itemToPlugin(context, entry, "main").apply(compiler);
			} else if (typeof entry === "object") {
				for (const name of Object.keys(entry)) {
					itemToPlugin(context, entry[name], name).apply(compiler);
				}
			} else if (typeof entry === "function") {
				new DynamicEntryPlugin(context, entry).apply(compiler);
			}
			return true;
		});
	}
};
除了 EntryOptionPlugin,其他的内置插件也会有特定的钩子在特定的任务点来完成特定的逻辑,当 Compiler 实例加载完内置插件之后,下一步就会直接调用 compiler.run 方法来启动构建。
// webpack 4.41.5
// lib/Compiler.js

run(callback) {
  const onCompiled = (err, compilation) => {
    if (this.hooks.shouldEmit.call(compilation) === false) {
      // ...
    }

    this.emitAssets(compilation, err => {
      //...
    });
  };

  // 执行 beforeRun 钩子
  this.hooks.beforeRun.callAsync(this, err => {
    // 执行 run 这个 钩子
    this.hooks.run.callAsync(this, err => {
      if (err) return finalCallback(err);

      this.readRecords(err => {
        // 开始打包编译
        this.compile(onCompiled);
      });
    });
  });
}

// ...
compile(callback) {
  // Compilation类的参数
  const params = this.newCompilationParams();
  // 1. 执行beforeCompile 钩子回调
  this.hooks.beforeCompile.callAsync(params, err => {
    if (err) return callback(err);
    // 2. 执行 Compiler.compile 钩子回调
    this.hooks.compile.call(params);
    // 3. 实例化 Compilation
    const compilation = this.newCompilation(params);

    // 4. 执行 Compiler.make 钩子回调
    // make内实际主要是执行的compilation的addEntry方法(**注意这里**)
    this.hooks.make.callAsync(compilation, err => {
      if (err) return callback(err);

      compilation.finish(err => {
        if (err) return callback(err);

        // seal方法整理构建之后的chunk产出
        // 这里会做一些优化相关的事情,比如压缩代码等
        compilation.seal(err => {
          if (err) return callback(err);

          this.hooks.afterCompile.callAsync(compilation, err => {
            if (err) return callback(err);
            return callback(null, compilation);
          });
        });
      });
    });
  });
}
newCompilationParams 主要是生成对应 compilation 用到的参数:
// webpack 4.41.5
// lib/Compiler.js
newCompilationParams() {
  const params = {
    // normal module
    normalModuleFactory: this.createNormalModuleFactory(),
    // context module
    contextModuleFactory: this.createContextModuleFactory(),
    // 依赖关系表
    compilationDependencies: new Set()
  };
  return params;
}
compilation 是后续构建流程中最核心最重要的对象,它包含了一次构建过程中所有的数据,一次构建过程对应一个 Compilation 实例。当 Compilation 实例创建完成之后,Webpack 的准备阶段已经完成,下一步将开始编译阶段。
# 编译阶段
从 Compiler 的 make 钩子触发开始,此时内置插件 SingleEntryPlugin、MultiEntryPlugin、DynamicEntryPlugin (根据不同类型 entry)的监听器会开始执行。监听器都会调用 Compilation 实例的 compilation.addEntry() 方法,该方法将会触发第一批 module 的解析,这些 module 就是 entry 中配置的模块。
我们可以通过以下命令查找到 webpack 目录下所有 hooks.make 注册的函数:
grep "hooks.make" -rn ./node_modules/webpack
结果如下图所示:

拿 SingleEntryPlugin.js 举例,我们可以看到 make 钩子上注册的方法:compilation.addEntry,
// webpack 4.41.5
// lib/SingleEntryPlugin.js
apply(compiler) {
	// ...

  compiler.hooks.make.tapAsync(
    "SingleEntryPlugin",
    (compilation, callback) => {
      const { entry, name, context } = this;

      const dep = SingleEntryPlugin.createDependency(entry, name);
      compilation.addEntry(context, dep, name, callback);
    }
  );
}
compilation.addEntry 方法如下:
// webpack 4.41.5
// lib/Compilation.js
addEntry(context, entry, name, callback) {
  // ...
  // 执行内部 _addModuleChain 方法
  this._addModuleChain(
    context,
    entry,
    module => {
      this.entries.push(module);
    },
    (err, module) => {
      // ...
    }
  );
}
一个 module 解析完成之后的操作,webpack 会递归调用它所依赖的 modules 进行解析,所以当解析停止时,我们就能得到项目中所依赖的 modules,他们会存储在 Compilation 实例的 modules 属性中,并触发了 Compilation 的 finishModules 的钩子。
module 对象有 NormalModule、ContextModule、ExternalModule、DelegatedModule、MultiModule、DllModule 等多种类型(分别在对应的 lib/*Module.js 中实现)。
NormalModule:普通模块
ContextModule:./src/a、./src/b
ExternalModule:module.exports =jQuery
DelegatedModule:比如manifest文件
MultiModule:entry: ['a', 'b']
我们以 NormalModule 为例讲解下 module 的解析流程:
NormalModule 的实例化是借助于 NormalModuleFactory.create() 方法,在 _addModuleChain 会有相应的区分,NormalModuleFactory 我们之前也讲过来自于创建 compilation 时传入的参数。
在 NormalModule 执行之前会调用 resolver 来获取一个 modules 的属性,比如解析这个 module 需要用到的 loaders,资源路径 resource 等等:
// webpack 4.41.5
// lib/Compilation.js
buildModule(module, optional, origin, dependencies, thisCallback) {
  // ...
  this.hooks.buildModule.call(module);
  module.build(
    this.options,
    this,
    // 获取一个 modules 的属性
    this.resolverFactory.get("normal", module.resolveOptions),
    this.inputFileSystem,
    error => {
      // ...
      if (error) {
        // build 失败钩子
        this.hooks.failedModule.call(module, error);
        return callback(error);
      }
      // build 成功钩子
      this.hooks.succeedModule.call(module);
      return callback();
    }
  );
}
resolver 是指来自于 enhanced-resolve 模块,它主要功能是一个提供异步 require.resolve,即从哪里去查找文件的路径,可以通过 Webpack 的 resolve 和 resolverLoader 来配置。Compiler 类有三种类型的内置 Resolver:
Normal:通过绝对路径或相对路径,解析一个模块;Context:通过给定的上下文(context)解析一个模块;Loader:解析一个webpack loader。
在创建完 NormalModule 实例之后会调用 NormalModule.build() 方法继续进行内部的构建,NormalModule.build() 会调用 NormalModule.doBuild(),在 doBuild 中执行 loader,生成 AST 语法树。
// webpack 4.41.5
// lib/NormalModule.js
doBuild(options, compilation, resolver, fs, callback) {
  const loaderContext = this.createLoaderContext(
    resolver,
    options,
    compilation,
    fs
  );

  runLoaders(
    {
      resource: this.resource,
      loaders: this.loaders,
      context: loaderContext,
      readResource: fs.readFile.bind(fs)
    },
    (err, result) => {
      // ...
      if (err) {
        // ...
        return callback(error);
      }

      const resourceBuffer = result.resourceBuffer;
      const source = result.result[0];
      const sourceMap = result.result.length >= 1 ? result.result[1] : null;
      const extraInfo = result.result.length >= 2 ? result.result[2] : null;
			// ...
      // 这里是处理后的源码
      this._source = this.createSource(
        this.binary ? asBuffer(source) : asString(source),
        resourceBuffer,
        sourceMap
      );
      this._sourceSize = null;

      // 这里是ast
      this._ast =
        typeof extraInfo === "object" &&
        extraInfo !== null &&
        extraInfo.webpackAST !== undefined
        ? extraInfo.webpackAST
      		: null;
      return callback();
    }
  );
}
当一个模块编译成功之后,有会根据其 AST 查找依赖,递归整个构建流程,直到整个所有依赖都被处理完毕。得到 所有的 modules 之后,Webpack 会开始生成对应的 chunk。
查找依赖的过程是在 doBuild 的 callback 函数中使用 lib/Parser.js 这个函数来查找 AST 中的依赖,他是基于 acorn 这个工具来进行依赖分析的。
// webpack 4.41.5
// lib/NormalModule.js
build(options, compilation, resolver, fs, callback) {
  // ...
  return this.doBuild(options, compilation, resolver, fs, err => {
    this._cachedSources.clear();

    // if we have an error mark module as failed and exit
    if (err) {
      this.markModuleAsErrored(err);
      this._initBuildHash(compilation);
      return callback();
    }

    // ...
		// 遍历 AST 或者 源码 查找相关依赖
    try {
      const result = this.parser.parse(
        this._ast || this._source.source(),
        {
          current: this,
          module: this,
          compilation: compilation,
          options: options
        },
        (err, result) => {
          if (err) {
            handleParseError(err);
          } else {
            handleParseResult(result);
          }
        }
      );
      if (result !== undefined) {
        // parse is sync
        handleParseResult(result);
      }
    } catch (e) {
      handleParseError(e);
    }
  });
}
chunk 的生成算法如下:
Webpack 先将 entry 中对应的 module 都生成一个新的 chunk;
遍历 module 的依赖列表,将依赖的 module 也加入到 chunk 中;
如果一个依赖module是动态引入(import()、require.ensure())的模块,那么就会根据这个module创建一
个新的 chunk,继续遍历依赖;
重复上面的过程,直至得到所有的 chunks。
得到所有的 chunks 之后,webpack 会进入 Compilation.seal() 阶段,在这个阶段会对 chunks 和 modules 进行一些优化相关的操作,比如分配 id,排序,创建 hash 等,这个时候就会触发 webpack.optimize 配置中的用到的插件。
更多的 seal 阶段的操作,大家可以到 lib/Compilation.js 中去查看。
到这里,编译阶段结束了,到了产出阶段。
# 产出阶段
在产出阶段,webpack 会根据 chunks 生成最终文件。主要有三个步骤:模板 hash 更新,模板渲染 chunk,生成 bunlde 文件。
Compilation 在实例化的时候,就会同时实例化三个对象:mainTemplate,chunkTemplate ,moduleTemplate , 这三个对象是用来渲染 chunk 对象,得到最终代码的模板。
mainTemplate:对应了在 entry 配置的入口 chunk 的渲染模板;chunkTemplate:动态引入的非入口 chunk 的渲染模板;moduleTemplate:chunk 中的 module 的渲染模板。
在开始渲染之前, Compilation 实例会调用 Compilation.createHash() 方法来生成这次构建的 Hash,在 Webpack 的配置中,我们可以在 output.filename 中配置 [hash] 占位符,最终就会替换成这个 Hash。同样,
Compilation.createHash() 也会为每一个 chunk 也创建一个 Hash,对应 [chunkhash] 占位符。
// webpack 4.41.5
// lib/Compilation.js
seal(callback) {
  this.hooks.seal.call();
  // ...

  this.hooks.beforeHash.call();
  this.createHash();
  this.hooks.afterHash.call();

  // ...
}
当 hash 创建完成之后,下一步就会遍历 Compilation 对象的 chunks 属性,来渲染每一个 chunk。如果一个chunk 是入口 (entry) chunk,那么就会调用 MainTemplate 实例的 render 方法,否则调用 ChunkTemplate 的 render 方法:
// webpack 4.41.5
// lib/Compilation.js
createHash() {
  // ...
  for (let i = 0; i < chunks.length; i++) {
    const chunk = chunks[i];
    const chunkHash = createHash(hashFunction);
    try {
      if (outputOptions.hashSalt) {
        chunkHash.update(outputOptions.hashSalt);
      }
      chunk.updateHash(chunkHash);
      // 根据类型选择模板
      const template = chunk.hasRuntime()
      ? this.mainTemplate
      : this.chunkTemplate;
      template.updateHashForChunk(
        chunkHash,
        chunk,
        this.moduleTemplates.javascript,
        this.dependencyTemplates
      );
      this.hooks.chunkHash.call(chunk, chunkHash);
      chunk.hash = /** @type {string} */ (chunkHash.digest(hashDigest));
      hash.update(chunk.hash);
      chunk.renderedHash = chunk.hash.substr(0, hashDigestLength);
      this.hooks.contentHash.call(chunk);
    } catch (err) {
      this.errors.push(new ChunkRenderError(chunk, "", err));
    }
  }
  // ...
}
当每个 chunk 的源码生成后,就会通过 Compilation.emitAsset 这个方法,添加到 Compilation 的 assets 属性中去
// webpack 4.41.5
// lib/Compilation.js
emitAsset(file, source, assetInfo = {}) {
  if (this.assets[file]) {
    if (!isSourceEqual(this.assets[file], source)) {
      // TODO webpack 5: make this an error instead
      this.warnings.push(
        new WebpackError(
          `Conflict: Multiple assets emit different content to the same filename ${file}`
        )
      );
      this.assets[file] = source;
      this.assetsInfo.set(file, assetInfo);
      return;
    }
    const oldInfo = this.assetsInfo.get(file);
    this.assetsInfo.set(file, Object.assign({}, oldInfo, assetInfo));
    return;
  }
  this.assets[file] = source;
  this.assetsInfo.set(file, assetInfo);
}
当所有的 chunk 都渲染完成之后, assets 就是最终更要生成的文件列表。
完成上面的操作之后,Compilation 的 seal 方法结束,进入到 compiler 的 emitAssets 方法,Compilation 工作到此也全部结束了,这也意味着一次构建过程已经结束,接下来 Webpack 会直接遍历 compilation.assets 生成所有文件,然后触发任务点 done,结束构建流程。
# 验证
我们可以遍历 comipler.hooks,使用 hook.tap 的方法添加回调函数,将 hookName 打印出来,前面我们有提到过相关方法,但是 hooks 会打印不全,前面是直接从 run() 方法时候开始的,缺少了环境变量和参数处理的流程,的比如 environment、afterEnvironment 会打印不出来。
为了显示全,我们可以在 lib/Compiler.js 中加入的 constructor 函数中加入如下代码:
// webpack 4.41.5
// lib/Compiler.js
constructor() {
  // ...
  Object.keys(this.hooks).forEach(hookName => {

    if (this.hooks[hookName].tap) {
      this.hooks[hookName].tap('anyString', () => {
        console.log(`compiler -> ${hookName}`);
      });
    }
  });
}
可以看到相比较之前多出了下面几个过程:
 environment
 afterEnvironment
 entryOption
 afterPlugins
 afterResolvers
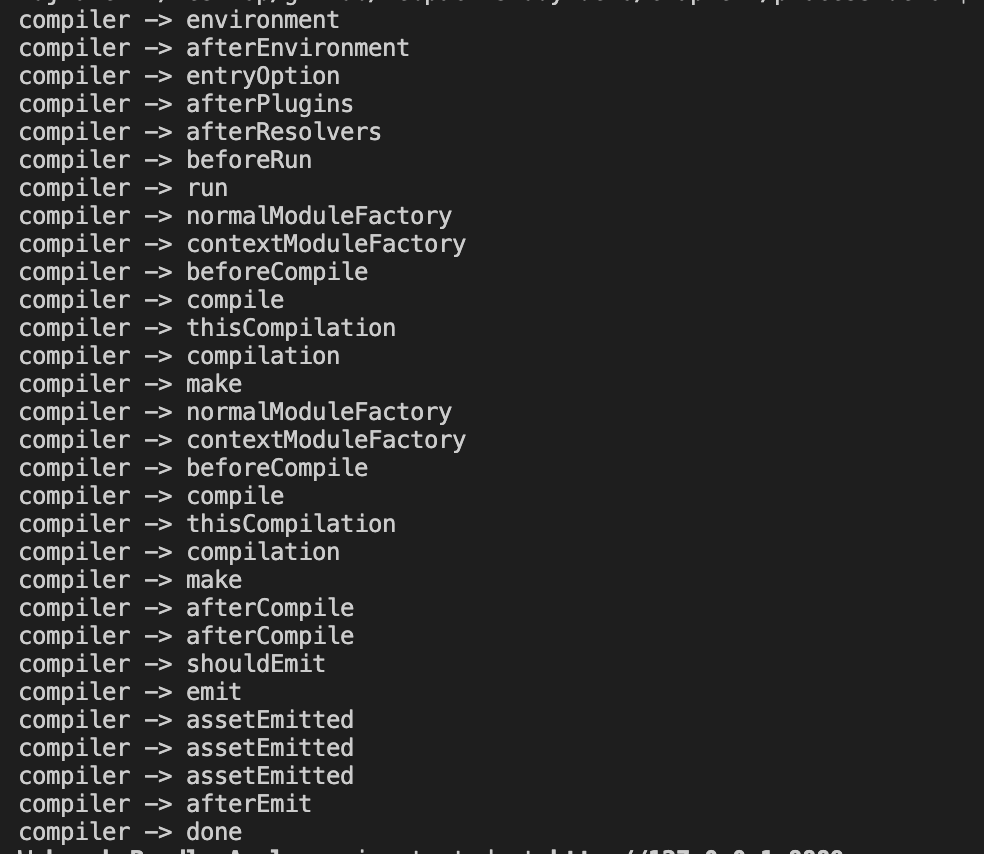
接着我们可以使用同样的方法给 Compilation 添加上同样的方法,这样就可以看到 webpack 构建的整个钩子流程了:
// webpack 4.41.5
// lib/Compilation.js
constructor() {
  // ...
  Object.keys(this.hooks).forEach(hookName => {

    if (this.hooks[hookName].tap) {
      this.hooks[hookName].tap('anyString', () => {
        console.log(`	Compilation -> ${hookName}`);
      });
    }
  });
}
这样我们就可以看到所有的 hooks 了:
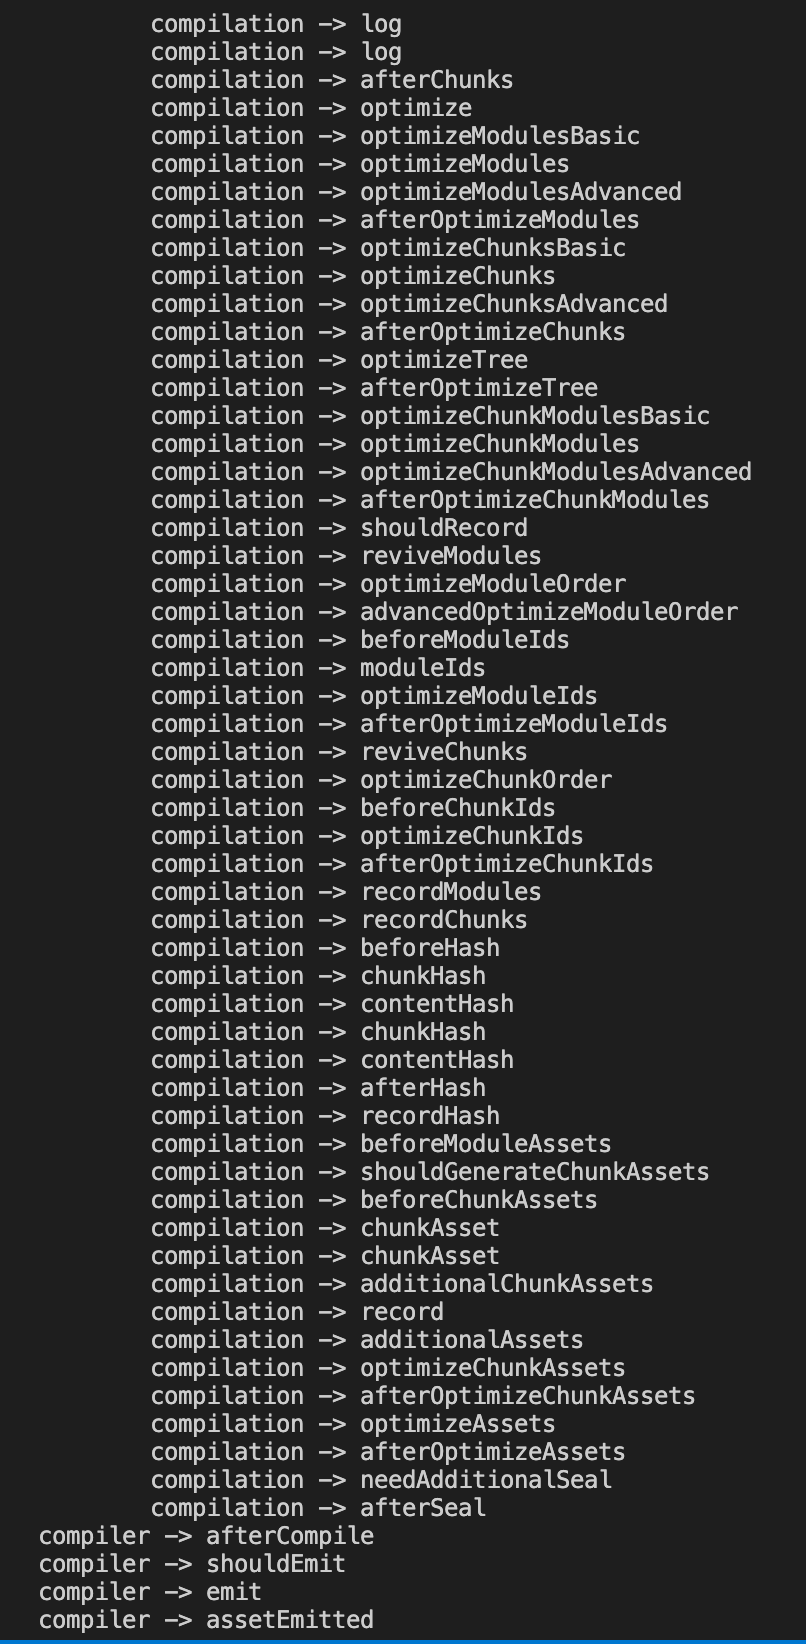

接着我们可以运行 npm run dev,来更好的理解一下 Compiler 和 Compilation 的区别,这个时候 webpack 是处于 watch 模式,他与普通模式的流程还是有一些区别的,如下:
// 普通模式
compiler -> afterResolvers
compiler -> beforeRun (不同)
compiler -> run (不同)
compiler ->	normalModuleFactory

// watch 模式
compiler ->	afterResolvers
compiler ->	watchRun (不同)
compiler ->	normalModuleFactory
我们修改一些入口文件 src/index.js,可以发现 compiler 只是从 invaile -> watchRun 开始,没有重新走流程,但是 Compilation 却走完了一个流程,在这里我们可以得出:compiler 是管理整个生命周期的,而 compilation 是每次编译触发都会重新生成一次的。
# 总结
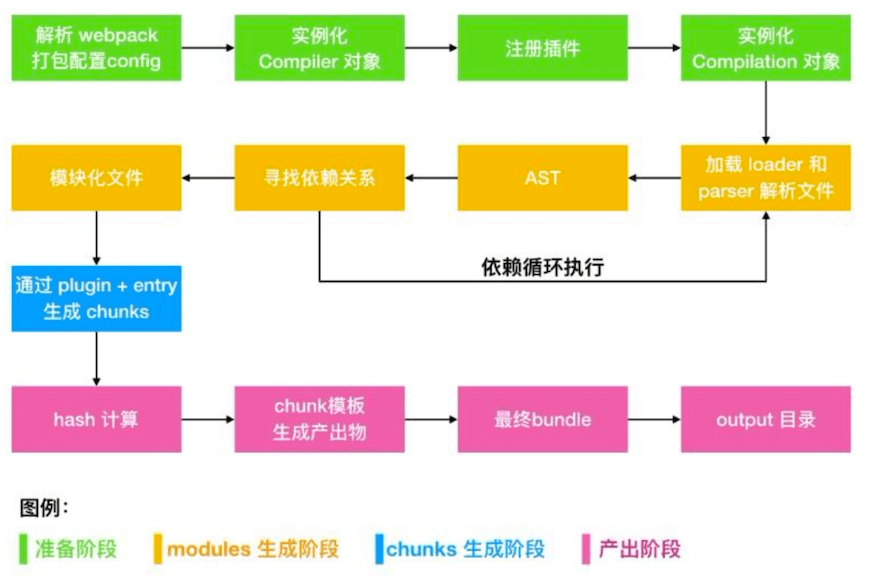
这一节我们主要分析了 webpack 的构建流程,我们在来回顾一波 webpack 的流程:
初始化参数:包括从配置文件和
shell中读取和合并参数,然后得出最终参数。使用上一步得到的参数实例化一个
Compiler类,注册所有的插件,给对应的Webpack构建生命周期绑定Hook。开始编译:执行
Compiler类的run方法开始执行编译。compiler.run方法调用compiler.compile,在compile内实例化一个Compilation类,Compilation是做构建打包的事情,主要事情如下:- 查找入口:根据
entry配置,找出全部的入口文件 - 编译模块:根据文件类型和
loader配置,使用对应loader对文件进行转换处理 - 解析文件的
AST语法树 - 找出文件依赖关系(
arcon) - 递归编译依赖的模块
- 查找入口:根据
递归完后得到每个文件的最终结果,根据
entry配置生成代码块chunk输出所有
chunk到对应的output路径,打包完成。
举例流程可参考下图:
这篇文章具体是参考了 慕课网专栏——Webpack 从零入门到工程化实战 中的 webpack 构建流程 这一章,讲的贼仔细,墙裂推荐。
# 相关链接
- webpack详解
- tapable\compiler\compilation
- webpack 教程
- 细说 webpack 之流程篇
- webpack系列之五module生成2
- webpack系列之一总览
- 玩转webpack(二):webpack的核心对象
- Webpack系列-第三篇流程杂记
- webpack module
- minipack
# 示例代码
示例代码可以看这里,具体是在 node_modules 中 webpack 文件: